

Atmosphere
CyVerse operates a cloud service called Atmosphere. Users can request up to 5,000 allocation units [units are hours (hr)] per month. E.g. a 1-core instance uses 1 AU/hr, a 4-core instance uses 4 AU/hr, and a 16-core instance uses 16 AU/hr. Allocations are automatically reset to 128 AU on the 1st of each month.
Some things to remember about the platform
- Allocation Units can be requested each month, but expire at the end of the month. Users can request more AU by clicking the Request More Resources button in the Atmosphere UI. You can also get help by asking questions in the Intercom (blue button in the lower right of the CyVerse website pages).
- Don’t leave VMs running that aren’t being used (be a good data science neighbor and free resources for others).
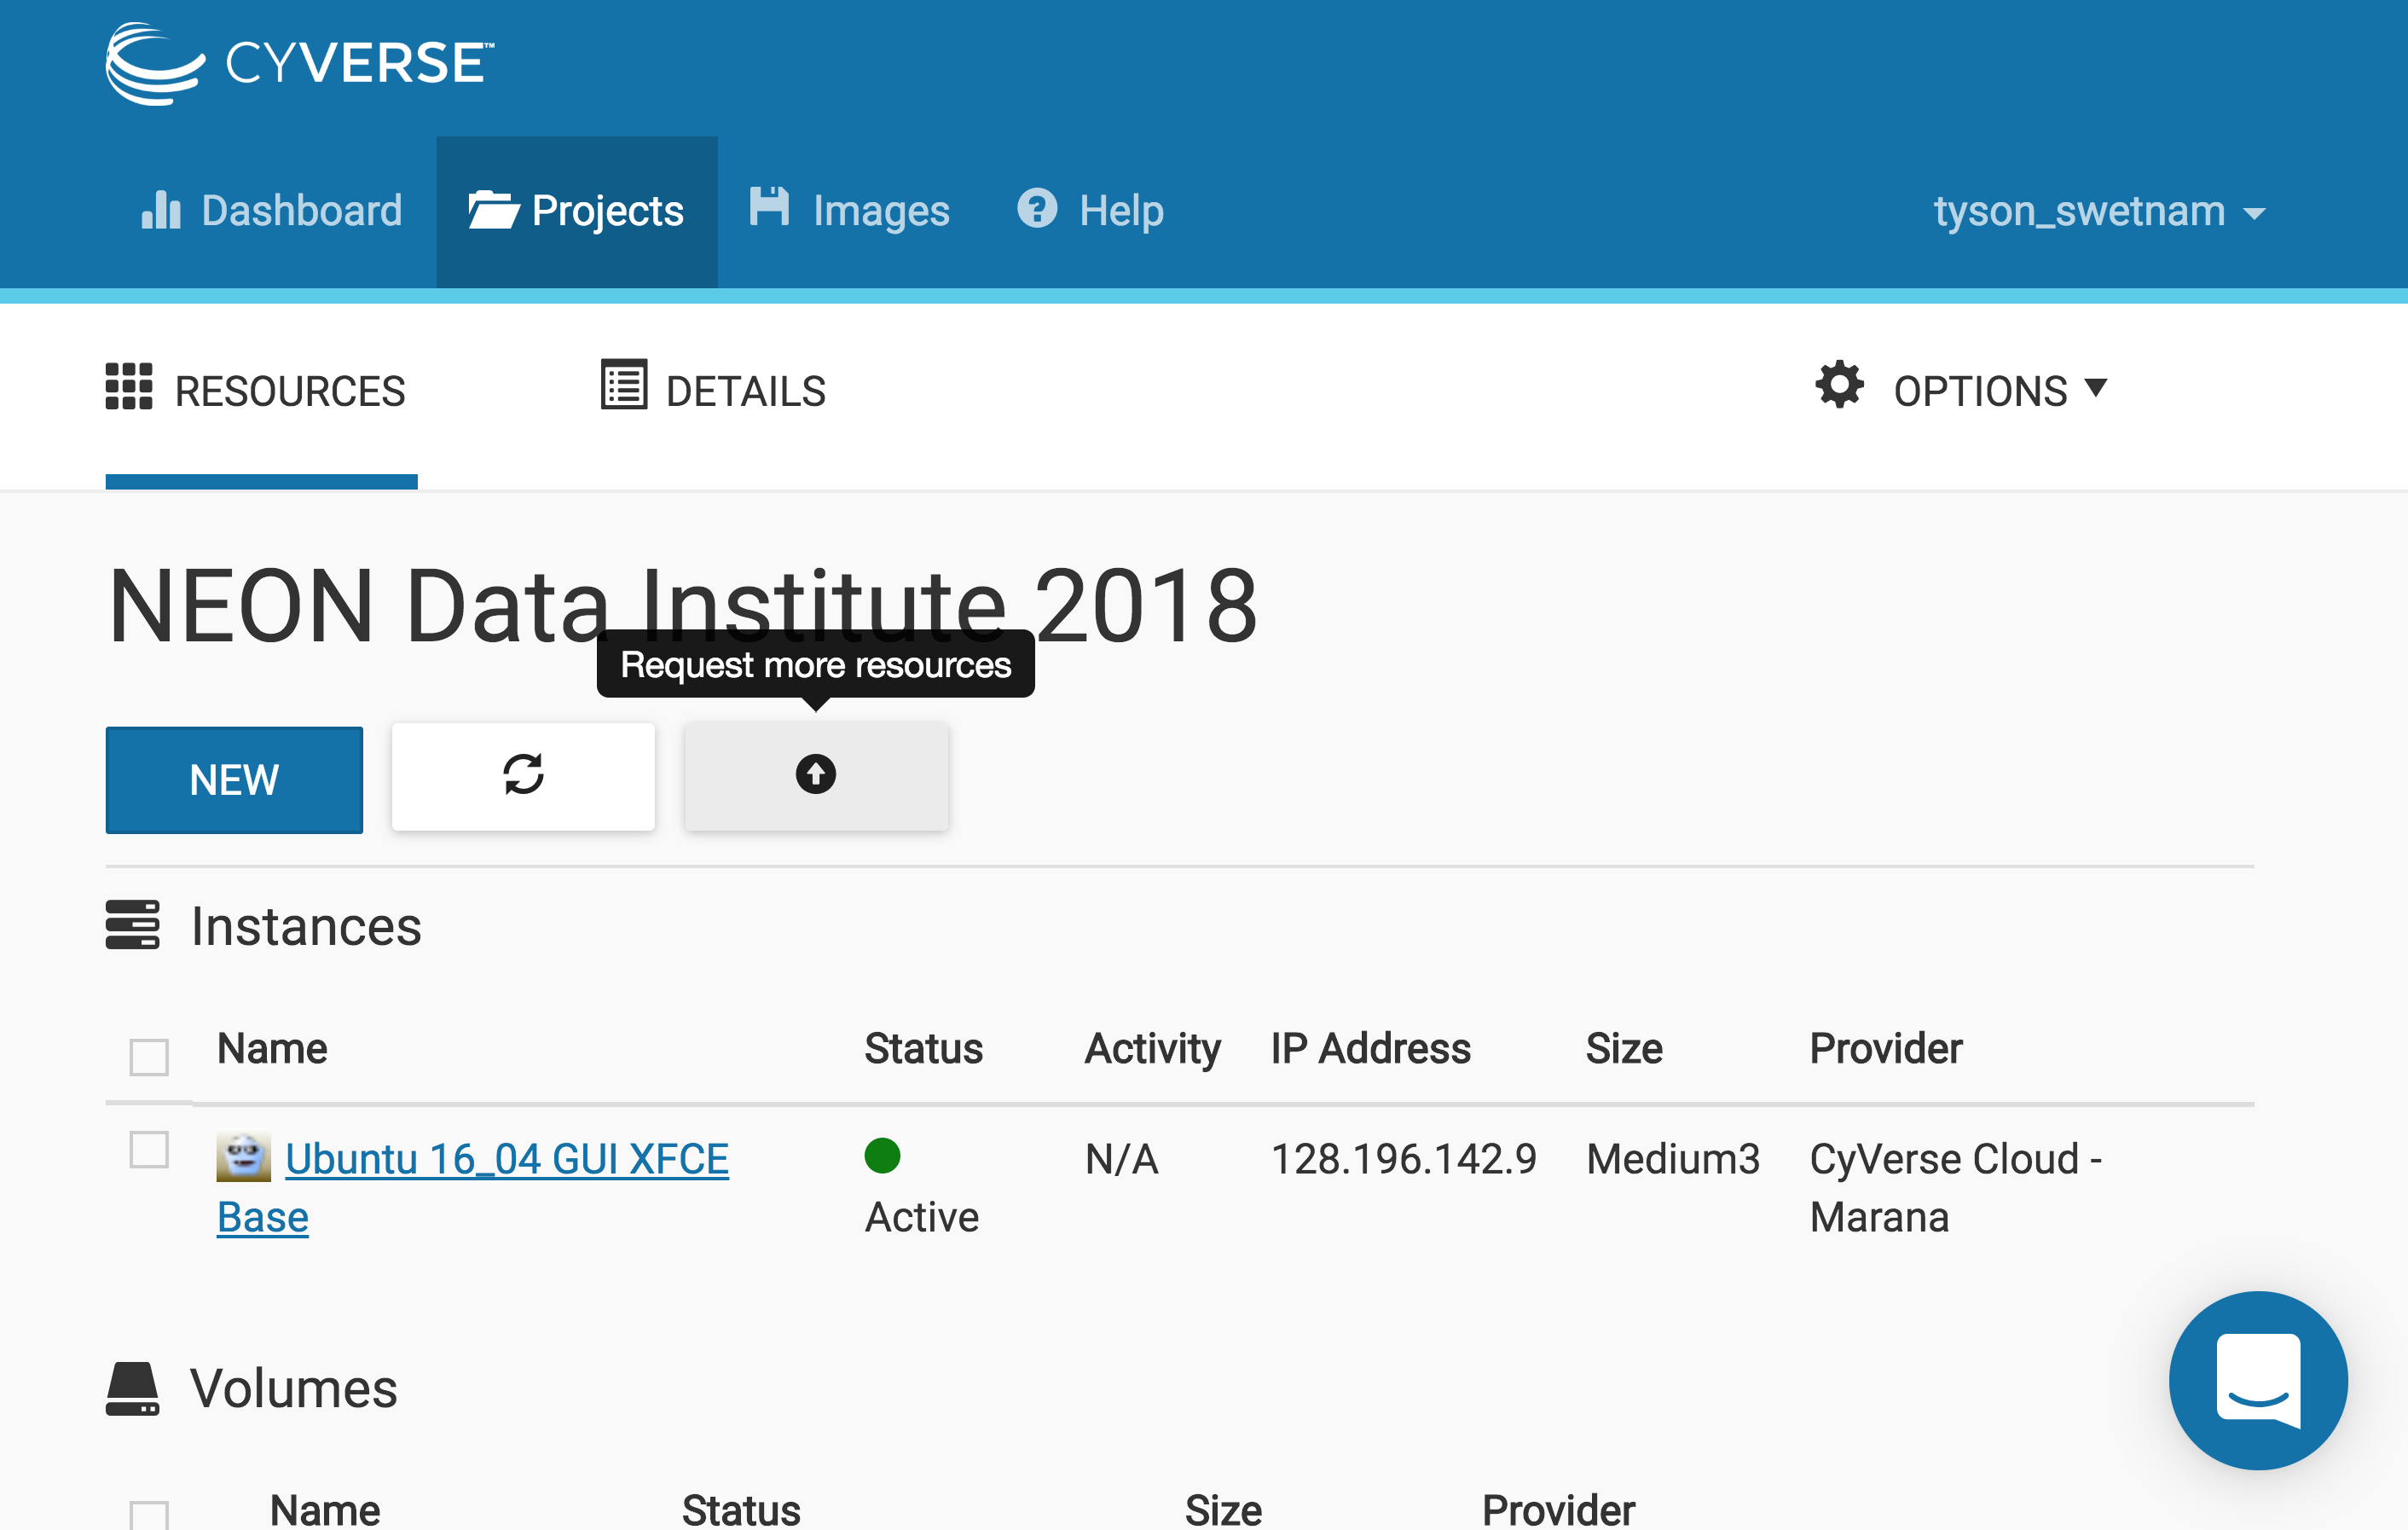
Virtual Machines on Atmosphere or Jetstream

Login
Log into CyVerse Atmosphere
Alternately, log into XSEDE Jetstream
Fill in your username and password and click “LOGIN”
Create a Project
This is something you only need to do once.
- Click on the “Projects” tab on the top and then click “CREATE NEW PROJECT”
- Enter a name, e.g. “FOSS2019” into the Project Name field.
- the Description can be something complex and long (like an extended abstract, or tutorial), or something short like “CyVerse FOSS 2019”.
- Select the newly created project
Start a new Instance
From your Project folder, you can select “New” and “Instance”
- Suggest you select a featured image with a Graphic User Interface (GUI).
Suggested Atmosphere Image(s):
Atmosphere Image(s):
Here are the tested Ubuntu images.
Warning: The latest version of Ubuntu (18.04) may not have current packages for some software.
| Image Name | Version | Description | Link |
|---|---|---|---|
| Ubuntu 18.04 GUI | 1.0 | Ubuntu 18.04 GUI XFCE Base | Image |
| Ubuntu 18.04 non-GUI | 1.0 | Ubuntu 18.04 non-GUI Base | Image |
- Find the “Ubuntu 18.04” image, click on it
- Give it a short name that is distinct “my_first_vm”
- Select ‘tiny1 (CPU: 1, Mem: 4GB, Disk: 30GB)’. Because this is your first attempt at provisioning a virtual machine it doesn’t need to be a workhorse (yet).
- Leave rest of the fields as default.
- Wait for it to become active
- Be Patient (but not too patient - if it takes >10 minutes the system may be at capacity, if you’re trying to launch a large or extra large VM, try something smaller).
- You can click on your new instance to get more information.
Accessing the Shell
Once the instance is active, you can access it via ssh or by using the Web Shell provided by Atmosphere.
- Click “Open Web Shell”, or, if you know how to use ssh,
you can ssh in with your CyVerse username on the IP address of the machine
ssh CyVerseUserName@<INSTANCE-IP-ADDRESS>
You should see something like this
Welcome to Ubuntu 18.04.2 LTS (GNU/Linux 4.4.0-81-generic x86_64)

  Get cloud support with Ubuntu Advantage Cloud Guest:
    http://www.ubuntu.com/business/services/cloud

155 packages can be updated.
0 updates are security updates.


*** System restart required ***
Welcome to
    _   _                             _
   / \ | |_ _ __ ___   ___  ___ _ __ | |__   ___ _ __ ___
  / _ \| __| '_ ` _`  \ / _ \/ __| '_ \| '_ \ / _ \ '__/ _ \
 / ___ \ |_| | | | | | (_) \__ \ |_) | | | |  __/ | |  __/
/_/   \_\__|_| |_| |_|\___/|___/ .__/|_| |_|\___|_|  \___|

cyverse_username@vm142-39:~$
Note, this instance is running an older version of Ubuntu 18.
A good practice before installing any new software is to run:
sudo apt-get update && sudo apt-get upgrade
After the new updates are installed you can reboot the machine from terminal or from the Atmosphere UI
sudo reboot
If you’re using the Web Shell, the instance will exit. Wait a few minutes for the instance to reboot and refresh the screen.
Note
To access the Clipboard in an Apache Guacamole Web Shell:
- Open Clipboard and virtual keyboard - On a standard keyboard: ctrl + alt + shift key - On a MAC OS X keyboard: control + command ⌘ + shift key
- Select your text or paste text into the clipboard window.
- Close the Clipboard window by selecting control + command ⌘ + shift keys again
- Right click with your mouse or double tap fingers on touchpad to paste in the web shell or Desktop
Suspending an instance
- When you’re done using an instance it is wise to ‘Suspend’ the instance in the Actions.
- This will kill any process that is still running.
- Your data and all of your programs will be fine. It is however wise to move your data back onto your DataStore or back it up somewhere else so it will be available.
- Suspending the instance will leave it ready for reuse when you want to “resume” working on it.
- You will not be charged any AU while the instance is suspended.
Deleting your instance
- To completely remove your instance, you can select the “delete” buttom from the instance details page.
- This will open up a dialogue window. Select the “Yes, delete this instance” button.
- It may take Atmosphere a few minutes to process your request. The instance should disappear from the project when it has been successfully deleted.
Imaging an instance
The use of Docker and Singularity take a lot of the problems out of building unique software stacks on cloud - but sometimes these cannot be avoided.
- Have you created a unique software stack that you need to launch on a larger number of future instances?
- Does it take a long time to compile your software stack each time you launch a new instance?
- Only create images from the smallest possible versions of your instance. A larger imaged instance cannot be run on a smaller instance.
To request that your instance be imaged click the “Image” button from Actions.
Note
It is advisable to delete the machine if you are not planning to use it in future to save valuable resources. However if you want to use it in future, you can suspend it.
If you want to keep the instance for a future project, you can also “shelve” the instance. It will take a longer period of time to resume a shelved instance.
EZ Installation of Project Jupyter
We install Project Jupyter (Notebooks and Lab) using the Anaconda distribution. Within the Anaconda distribution is the conda package manager which can be used to both build and install software.
Anaconda is different than a basic Python installation. It serves as both a package manager and an environment. While this has many benefits, it also adds some complexity to running your Python environments. Still confused? Read about the myths and misconceptions of Anaconda.
For more details about installing software on Atmosphere visit the CyVerse Data Science Quickstart Tutorial or the Jetstream EZ Tutorial. There are instructions for ez installation of Docker, Singularity, and Anaconda.
If you’re on an instance which already has Anaconda installed, you’ll still need to re-run ez to restart the Anaconda virtual environment.
Install Anaconda with Python3 (
ezcomes preloaded on featured instances on Atmosphere and Jetstream) by typing:ezj
Once the installation completes, you’re done! A Jupyter Notebook should now be running on the VM.

- Click the link showing the notebook URL (notice this is not the localhost:8888).
Note
To install your own packages you’ll need to change ownership of the Anaconda installation:
sudo chown $(id -u):$(id -g) /opt/anaconda3 -R
Down version Python 3.6 to 3.5
To use GDAL you may need to reverse version Python to an earlier version
Kernel installation instructions
python -m pip install ipykernelconda create -n ipykernel_py35 python=3.5 ipykernel source activate ipykernel_py35 # On Windows, remove the word 'source' python -m ipykernel install --user
R
conda install -c r irkernel
JavaScript
sudo apt-get install nodejs-legacy npm ipython ipython-notebook
sudo npm install -g ijavascript
ijsinstall
Ruby
Add Jupyter PPA
sudo add-apt-repository ppa:chronitis/jupyter -y
sudo apt-get update
sudo apt-get install -y iruby
Python2 Kernel
conda create -n ipykernel_py2 python=2 ipykernel
source activate ipykernel_py2
python -m ipykernel install --user
source deactivate ipykernel_py2
conda activate base # switch back to base Python3 environment
Julia Kernel
First, install Julia, here we are installing v0.6.
Once Julia as been installed, run
juliafrom the prompt.wget https://julialang-s3.julialang.org/bin/linux/x64/0.6/julia-0.6.3-linux-x86_64.tar.gz tar xvzf julia-0.6.3-linux-x86_64.tar.gz sudo mv julia-d55cadc350/ /opt/julia rm -rf julia-0.6.3-linux-x86_64.tar.gz sudo ln -s /opt/julia/bin/julia /usr/local/bin/julia juliaNow, from Julia prompt install the iJulia Kernel.
Pkg.add("IJulia")
ENV["JUPYTER"] = "/opt/anaconda3/bin/jupyter"
Pkg.add("Feather")
Pkg.add("DataFrames")
Pkg.add("NamedArrays")
Bash Kernel
pip install bash_kernel
python -m bash_kernel.install
Geospatial dependencies
conda install -c conda-forge gdalsudo add-apt-repository -y ppa:ubuntugis/ubuntugis-unstable sudo apt update sudo apt install gdal-bin python-gdal python3-gdal libgdal1-dev
Script of Scripts
pip install sos
pip install sos-notebook
python -m sos_notebook.install
Installing RStudio-Server
RStudio can be installed in several ways.
First, you can follow the RStudio-Server instructions for Linux
Second, you can use Docker (following the same ez documentation as for Anaconda). We suggest using containers from Docker Hub Rocker on the instance.
ezd
sudo usermod -aG docker $USER
exit
docker pull rocker/geospatial
docker run -d -p 8787:8787 rocker/geospatial
Third, you can use Anaconda
Here we use ezj to install both Anaconda (Jupyter) and R
ezj -R
This will trigger the Ansible playbook to install r-base, r-essentials, and a few other commonly used R Data Science packages.
After ezj -R has finished, you can install RStudio-Server
Install these misc. dependencies
export PATH="/opt/anaconda3/bin":$PATH
sudo chown $(id -u):$(id -g) /opt/anaconda3/ -R
conda update conda
conda install gxx_linux-64
conda install gcc_linux-64
Set Path and install gdebi
sudo apt-get install gdebi-core
Install RStudio-Server with gdebi:
echo "export RSTUDIO_WHICH_R='/opt/anaconda3/bin/R'" >> ~/.bash_profile
wget https://download2.rstudio.org/rstudio-server-1.1.447-amd64.deb
sudo gdebi --non-interactive rstudio-server-1.1.447-amd64.deb
The installation of RStudio-Server is going to fail because we haven’t told it which R to use. Because we are using Anaconda’s installation of R, and not the basic installation of R, we have to reassign RStudio to look for Anaconda
sudo sh -c 'echo "rsession-which-r=/opt/anaconda3/bin/R" >> /etc/rstudio/rserver.conf'
# export RSTUDIO_WHICH_R='/opt/anaconda/lib/R/bin/R'
# sudo sh -c 'echo "launchctl setenv RSTUDIO_WHICH_R $RSTUDIO_WHICH_R" >> ~/.bash_profile'
Restart the server
sudo rstudio-server start
- You can launch Jupyter Lab by exiting the notebook and typing jupyter lab - but this will allow Lab to only be available on the localhost, with no way to connect from a remote terminal. Exit the notebook by pressing ctrl + c twice, and then start a Jupyter Lab.
Hands On
Sateesh’s Atmosphere Exercises
Note
To ensure your session doesn’t die when you close your terminal use tmux or screen to start your remote sessions and to detach the screen before exiting.
- detach screen: ctrl + b then d
- list tmux sessions:
tmux ls - re-attach screen:
tmux attach -t <session id #>
Establishing a Secure Connection
On the VM start the Lab in terminal (don’t forget to use tmux)
jupyter lab --no-browser --ip=* --port=8888
Option 1: SSH tunnel
You must have the ability to use ssh on your localhost to use this method.
Start Jupyter
jupyter lab --no-browser --ip=127.0.0.1 --port=8888
Open a new terminal on your localhost.
ssh -nNT -L 8888:localhost:8888 CyVerseUserName@<IPADDRESS>
Enter your password when prompted.
The terminal should stop responding after this.
In your browser, open a new tab and go to
http://localhost:8888
Option 2: Caddy
You can use this method with tmux in the Web Shell
Follow the same step #1 above
In the terminal start a new
tmuxsession. Then copy/paste the following:echo "$(hostname) proxy / 127.0.0.1:8888 { websocket transparent } " > Caddyfile curl https://getcaddy.com | bash -s personal http.nobots caddy
The Caddyserver will output a secure URL https:// for the Atmosphere VM which you can then connect in a new browser tab.
Copy / Paste the URL
https://vm142-xx.cyverse.orginto a new browser tab.
Description of output and results
Congratulations - you’ve got a Virtual Machine ready to do some serious data science!
Fix or improve this documentation:
- On Github: Github Repo Link
- Send feedback: Tutorials@CyVerse.org